
How to Swap Your Hard Drive for SSD
Upgrading from a traditional hard disk drive (HDD) to a solid-state drive (SSD) is one of the most noticeable performance improvements you can make on a PC or laptop. An SSD doesn’t just make your system boot faster; it speeds up application launches, file transfers, and overall responsiveness. For older systems, this single upgrade can make the machine feel brand new again.
The process is straightforward, but you’ll need to prepare properly before you start unscrewing cases and moving drives. Choosing the right SSD type, checking available connections, and deciding whether you want to clone your existing drive or perform a fresh install all matter. Once you’ve lined these up, the swap itself can take less than an hour.
Checking compatibility
Before you buy an SSD, confirm that it will physically and electronically fit your machine. Desktop PCs and laptops have slightly different requirements:
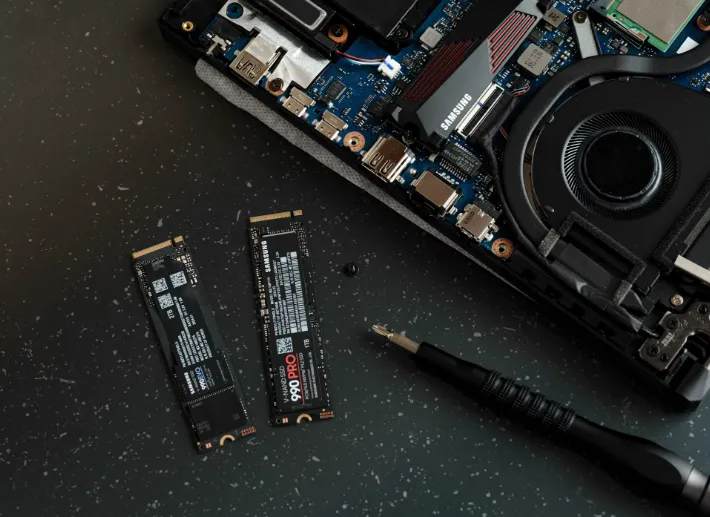
On desktops, most motherboards still support 2.5-inch SATA SSDs, which connect via the same cables as a hard drive. If your case has M.2 slots on the motherboard, you may be able to use a faster NVMe SSD. NVMe drives offer superior speeds but require a motherboard that specifically supports PCIe-based M.2 storage. Some older boards only accept SATA M.2 drives, so it’s essential to check the manual.
On laptops, compatibility depends on form factor and slot type. Many models accept 2.5-inch SATA SSDs, but ultrabooks often rely on M.2 drives. Measure the physical space and check whether your laptop supports 2242, 2260, or 2280 M.2 lengths. Also, confirm whether it supports SATA or NVMe protocols, as buying the wrong type will leave you with an unusable upgrade.
You should also ensure your operating system license can be reactivated after migration. For Windows 10 and 11, most digital licenses are tied to the hardware and will reactivate automatically, but it’s worth linking your license to a Microsoft account beforehand.
Preparing for the swap
Before you pull out your old drive, a little planning will save you from headaches later. The first step is deciding whether you’ll be cloning your existing hard drive or doing a clean installation of the operating system.
Cloning copies your current drive, operating system, programs, and files exactly as they are. This option is ideal if you don’t want to reinstall everything. You’ll need cloning software — many SSD manufacturers offer free utilities (Samsung Data Migration, Crucial Storage Executive, etc.), and third-party tools like Macrium Reflect also work well. Make sure the new SSD is at least as large as the used space on your current drive, otherwise the cloning won’t fit.
Clean installation means starting fresh. You back up your important files to an external drive or cloud storage, then install the operating system from scratch on the new SSD. This method avoids carrying over years of clutter, old drivers, and potential malware, but it requires reinstalling programs and reconfiguring settings. Windows users can download the Media Creation Tool to make a bootable USB installer, while macOS users can use Recovery Mode.
You’ll also need a few basic tools:
- A small Phillips screwdriver (for desktops and most laptops)
- An anti-static wrist strap or at least a grounded surface to discharge static electricity
- If you’re cloning on a laptop, often a USB-to-SATA or USB-to-M.2 adapter is necessary to connect the new SSD externally before swapping
Finally, back up everything — even if you’re cloning. Cloning operations sometimes fail, and fresh installs always wipe drives. Saving your documents, photos, and anything irreplaceable to another device or cloud service is non-negotiable.
Step-by-step installation
For desktops
- Shut down and unplug your PC, then hold the power button for a few seconds to discharge any remaining electricity.
- Open the case by removing the side panel. Keep screws in a safe spot.
- Locate the current drive. Hard drives are typically in 3.5-inch bays, while 2.5-inch SSDs go in smaller brackets or adapter trays.
- Disconnect cables from the old drive — the SATA data cable and SATA power cable.
- Mount the SSD. If using a 2.5-inch SSD, attach it to a 2.5-to-3.5-inch adapter bracket if your case requires it, then screw it into place. For an M.2 SSD, insert it at a 30-degree angle into the M.2 slot, then secure it with the screw provided.
- Reconnect cables. For SATA SSDs, use the same SATA power and data connections from the old drive. M.2 SSDs require no cables.
- Close the case, reconnect power, and boot into BIOS/UEFI to check that the system detects the SSD.

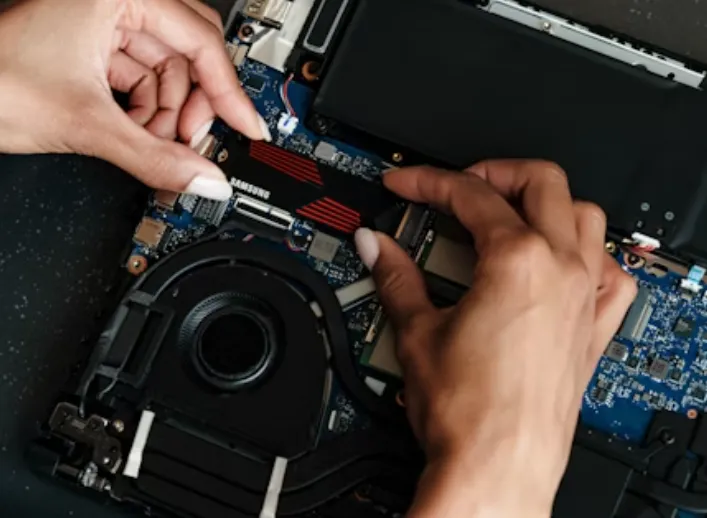
For laptops
- Shut down and unplug, then remove the battery if it’s removable.
- Unscrew the bottom panel. Some laptops provide a dedicated drive bay door; others require removing the entire panel.
- Locate the drive bay. Hard drives are usually mounted in caddies secured by a few screws.
- Disconnect and remove the old drive. Slide it gently out of the SATA or M.2 slot.
- Install the SSD. If it’s a 2.5-inch SATA SSD, slide it into the caddy and slot it in. If it’s M.2, insert it at an angle and screw it flat against the board.
- Reassemble the laptop, making sure no cables are pinched before screwing the panel back down.
Once the SSD is in place, restore your data: boot into your cloned copy or perform the clean OS installation from your USB stick.
What to expect after upgrading
The difference between an HDD and SSD is night and day. Boot times often drop from a full minute to under 15 seconds. Programs that once lagged open instantly, and tasks like unzipping files, copying data, or updating software feel much smoother. For laptops, SSDs also mean less heat, no moving parts, and slightly better battery life.
That said, don’t expect miracles in areas unrelated to storage speed. Your CPU and RAM still govern overall multitasking power, and your GPU dictates gaming performance. But for general everyday computing, the SSD upgrade will feel like you’ve bought an entirely new machine.