
Upgrading Your Power Supply (PSU) Safely
The power supply unit (PSU) is one of the most critical components in any computer. It converts the alternating current (AC) from your wall outlet into the stable direct current (DC) voltages that your motherboard, CPU, GPU, storage, and peripherals require. While it doesn’t directly affect frame rates or benchmark scores, a PSU plays a vital role in system stability and safety. A poorly chosen or failing PSU can cause random shutdowns, crashes, or even permanent damage to hardware.
Whether you’re upgrading to a more power-hungry GPU, building a new PC, or replacing an aging unit, swapping in a new PSU is a task that demands care. Done correctly, it ensures reliable performance and protects your investment. Done sloppily, it can create frustrating troubleshooting sessions or worse, put your system at risk. This guide walks through the basics of power supplies and how to install one safely.
Understanding PSU basics
Before diving into installation, it’s important to understand what a PSU does and how to evaluate its specifications. The first thing to note is wattage, which indicates the maximum load the PSU can deliver. High-end gaming rigs with powerful GPUs may need 750W or more, while a modest office machine can often run on 400–500W. However, wattage alone doesn’t tell the whole story.
Efficiency ratings are another key factor. PSUs are certified under the 80 Plus program, with tiers ranging from Bronze to Titanium. A Gold- or Platinum-rated unit wastes less power as heat, runs cooler, and usually lasts longer. Over time, this efficiency translates into lower electricity use and quieter operation.
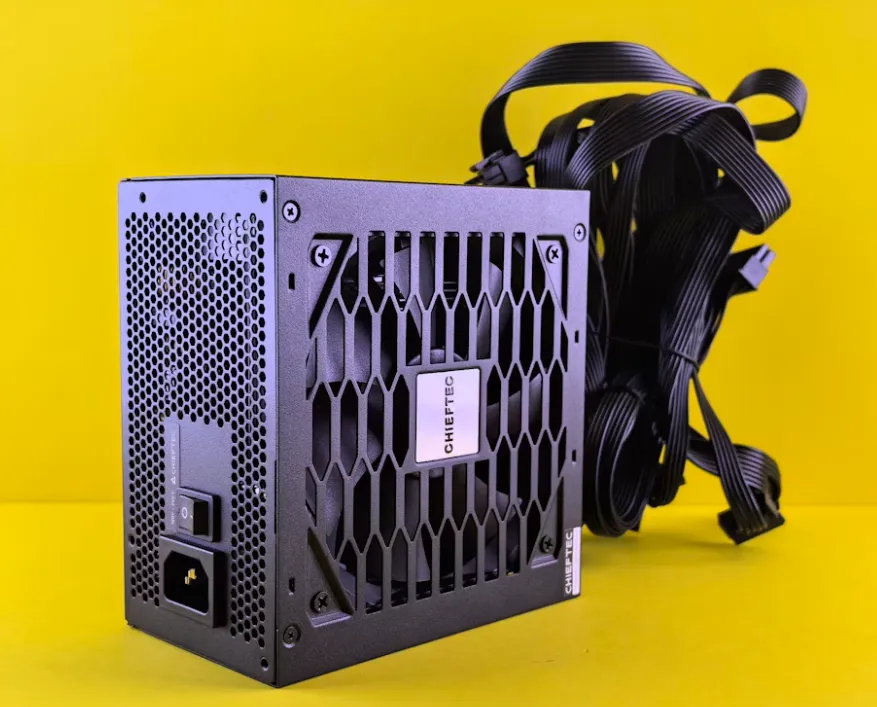
The design of the PSU also matters. Non-modular units have all cables permanently attached, which can lead to clutter inside your case. Semi-modular and fully modular PSUs let you connect only the cables you need, improving airflow and cable management.
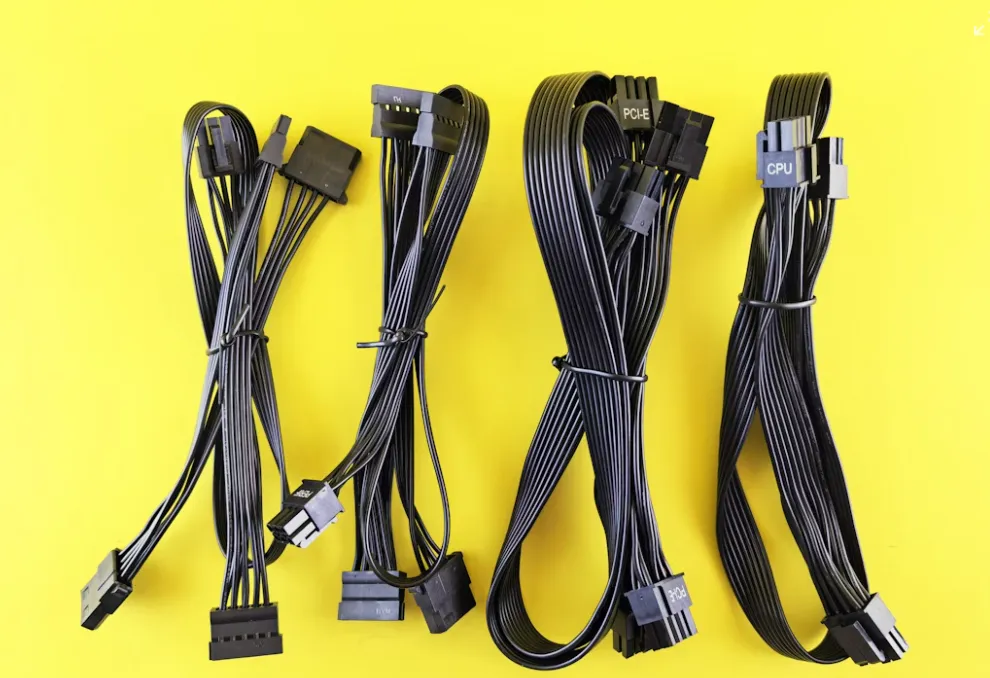
Finally, every PSU provides a set of rails and connectors. The most important ones are the 24-pin ATX connector for the motherboard, 8-pin (or 4+4-pin) connectors for the CPU, PCIe 6/8-pin (or newer 16-pin) connectors for GPUs, and SATA/Molex plugs for storage devices and accessories. Choosing a unit with the right connectors and sufficient amperage per rail is essential for safe operation.
Choosing the right PSU
Selecting a new power supply begins with knowing how much power your system actually needs. Every component contributes to the total demand — your CPU, GPU, drives, fans, and even RGB lighting. The GPU and CPU are the biggest consumers, and modern high-performance graphics cards can easily require 300 watts or more on their own.
A good rule of thumb is to aim for a PSU that can handle your system’s maximum load plus about 20–30% headroom. This ensures stable operation during heavy workloads and leaves room for future upgrades. For example, if your parts collectively draw around 500 watts, a 650–750 watt PSU is a safe bet. Efficiency ratings also matter. A Gold- or Platinum-rated unit not only runs cooler and quieter but also wastes less power as heat, which helps longevity.
Form factor is another consideration. Most mid- and full-tower desktops use ATX PSUs, but small form factor builds may need an SFX unit. Check your case’s dimensions before purchasing to avoid a mismatch. Cable design can also make a difference in day-to-day use. Modular or semi-modular models are usually worth the small premium since they help reduce clutter and improve airflow.
When in doubt, it helps to calculate your requirements rather than guess. That’s why we’ve built a PSU wattage calculator that makes it easy to input your parts list and get an accurate recommendation. It’s a simple way to avoid overspending on unnecessary wattage or, worse, underpowering your build.
Safety preparations before swapping
Before you open up your case, safety should be front of mind. Always power down the PC completely and unplug it from the wall. Pressing the power button once after unplugging helps discharge any remaining electricity stored in the system. To protect sensitive components from static electricity, either wear an anti-static wrist strap or ground yourself by touching a metal part of the case before handling parts.
Step-by-step replacement process
Replacing a PSU isn’t complicated, but it does require patience and a methodical approach. Rushing through the process can lead to loose connections or missed cables that cause boot failures later.
The first step is removing the old PSU. After unplugging the system and discharging any remaining power, open the case side panel. Follow each power cable from the PSU to its destination — the 24-pin motherboard connector, the 8-pin CPU connector near the top of the board, PCIe connectors for the GPU, and SATA or Molex plugs for drives and accessories. Gently unplug each one, noting their positions or even labeling them if you’re new to the process. Once all connections are free, unscrew the four screws at the back of the case that secure the PSU, and carefully slide the unit out.
With the old unit removed, position the new PSU in the same spot. Most cases place the PSU at the bottom, with the fan facing down through a dust-filtered vent. Align the mounting holes at the back and secure the unit with screws. Before connecting anything, take a moment to plan cable routing. If your PSU is modular, plug in only the cables you need. Feeding them through the case’s routing holes first makes the final build much neater and improves airflow.
Next, connect power to the key components in order of importance. Start with the 24-pin cable into the motherboard socket, ensuring it clicks into place. Then connect the 8-pin (or 4+4-pin) CPU power cable near the processor. After that, attach the PCIe connectors to your graphics card, matching the number of pins required. Finally, connect SATA power cables to storage drives and any accessories such as cooling pumps or fans that draw from the PSU.
Once every cable is connected, do a quick check. Look for any loose connectors, extra slack that could obstruct fans, or cables that are bent too sharply. A tidy layout not only looks better but prevents problems later with cooling and component wear.
Testing the installation
After installing the new PSU and reconnecting cables, it’s time to verify everything works. Start by double-checking all connections: the 24-pin motherboard cable, the CPU 8-pin, GPU connectors, and SATA power lines. If any of these are loose, the system may not boot.
Once you’re confident everything is seated, plug the PSU into the wall and flip the switch on the back to the “on” position. Press your PC’s power button and watch for signs of life: fans spinning, lights turning on, and the display coming alive. If the system powers on but doesn’t show an image, recheck GPU and motherboard connections.
After booting successfully into Windows or BIOS, monitor system behavior. Check hardware monitoring tools like HWMonitor or the BIOS’s system info screen for voltage stability. A healthy PSU should keep voltages within about ±5% of their rated values. Run your PC under load, such as a stress test or a game, to make sure the system remains stable.
Prevention and maintenance
Good power supply practices don’t end at installation. A few ongoing habits can protect your hardware and save headaches later. First, avoid cheap, off-brand units. They often exaggerate wattage ratings and use low-quality components, which can lead to dangerous failures. Stick to well-reviewed brands with proper certification.
Second, keep the PSU’s fan intake clear of dust and debris. If your case sits on carpet or in a dusty room, clean the filters and vacuum the intake area regularly. Reduced airflow can cause the PSU to overheat and shorten its lifespan. Finally, reassess your PSU when planning upgrades. Adding a second GPU, moving to a high-core-count CPU, or expanding storage may require more wattage than your current unit can safely provide.